Welcome
Mapify Continued is a Derail Valley mod for creating and loading custom maps. Here you can find all the information you'll need to create maps and contribute to the project!
If you want to start creating maps, head to the Project Setup page. If you want to contribute to the project through code or documentation improvements, check out the Contributing page.
If you're just a user who wants to install and use maps, visit the Using maps page.
Using Maps
The Mapify mod doesn't do anything on it's own. To use it you need to download a custom map.
Installing Maps
In general, it's best to follow the instructions in the description of the map mod. Here are some generic installation instructions as a fallback.
Manual
Maps can be installed manually like any other mod in the Unity Mod Manager GUI. Download the maps .zip file and drag and drop it into Unity Mod Manager.
Vortex
An alternative way to install maps is to use Vortex with the Derail Valley Support Extension.
To install a map from Nexus Mods using Vortex, click Mod Manager Download instead of Manual Download on the Files tab of the mod.
This will open Vortex, and prompt you to install the map.
Changing Maps
When creating a new session in Career or Sandbox mode, you can select the map you want to play on just below the difficulty. If a session has already been loaded, you cannot change the map.
Available map mods
This is a list of map mods that are currently available to download.
Proper maps
Test maps
Tostiman's test map
Wiz's Test Track
Rolling material testing map
Unavailable/broken maps
San Andreas (Needs to be updated)
Creating maps
So you want to create your own map? Great! Start here: Project Setup.
Project Setup
Before starting, a basic understanding of Unity concepts will be required.
If you need to get more familiar with Unity, Code Monkey has some great videos to get you up to speed. In particular, I'd recommend checking out this one:
Installing Unity
To create custom maps, you must install Unity 2019.4.40f1. The minor version is essential! If you don't have Unity installed, the easiest way to get it is through Unity Hub.
Once installed, click here to download the correct version.
When asked about modules, you only need to check Windows Build Support (Mono) if you're running Linux.
Everything else can be left unchecked.
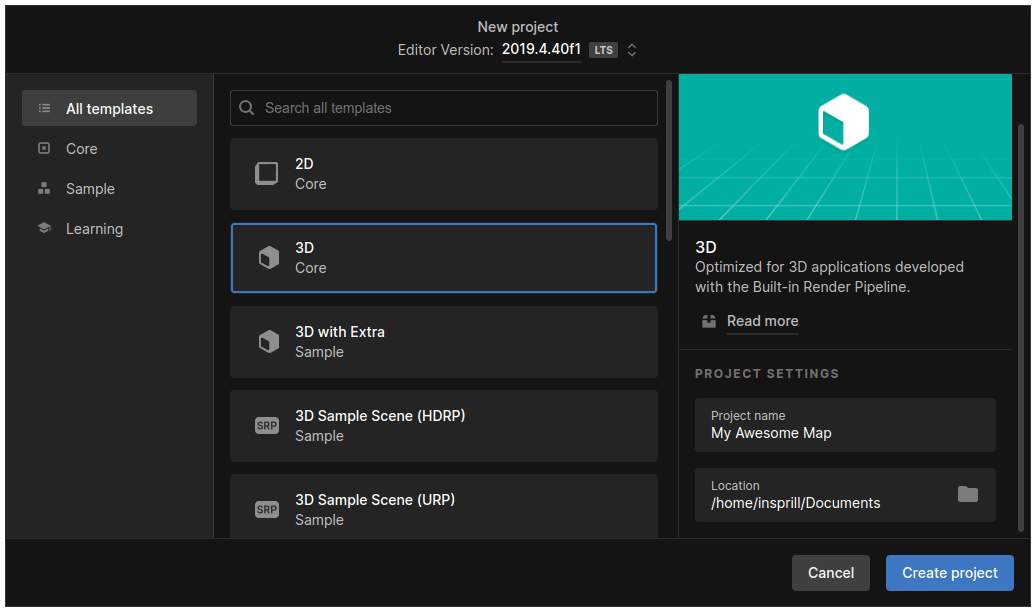
Creating The Project
Now that Unity is installed, you can create the project. In Unity Hub, click "New project" in the top right, and select the "3D" template. Name your project, select where you want it to be created, and click "Create project."
Adjusting Settings
Before you begin, you'll also need to adjust some Unity settings.
Firstly, if you're on Linux, you must set the Target Platform and Architecture to Windows and x86_64, respectively.
To do this, go to File > Build Settings. It may take a minute to change, but it should look like this once it does.

Secondly is the Color Space. To change this, go to Edit > Project Settings, then to Player > Other Settings, and change Color Space to Linear.

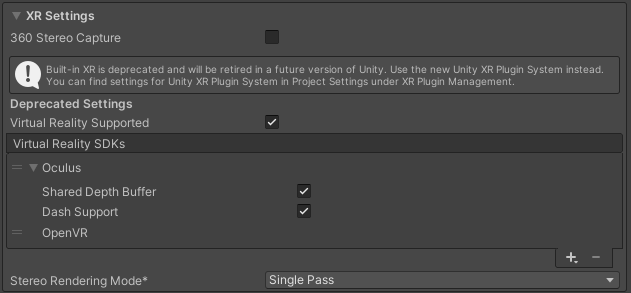
Third is VR settings so that VR players can enjoy your map too. In that same menu, close the "Other Settings" dropdown, and expand XR Settings.
In there, check Virtual Reality Supported and set the Stereo Rendering Mode to Single Pass.
When you're done, it should look like this.
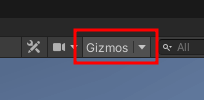
Lastly, you'll need to ensure Gizmos are enabled. Gizmos are used to render trackage and other previews in the editor. To toggle Gizmos, click the "Gizmos" button in the top right of the scene view.
Importing The Creation Package
To import the map creation package, download the .unitypackage file from the latest release from GitHub.
Then, back in Unity, go to Assets > Import Package > Custom Package and select the .unitypackage file you downloaded.
When the import prompt comes up, import everything.
Creating The Required Assets
Scenes
Mapify requires a unique scene setup to be compatible with Derail Valley.
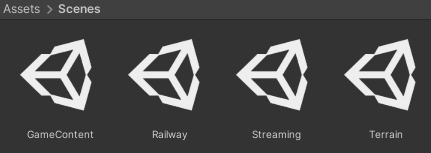
In your project's Scenes folder, create four scenes named Terrain, Railway, GameContent, and Streaming.
Each scene has a specific purpose, and you must respect what each scene is for.
Terrain
The Terrain scene is strictly for holding terrain.Railway
The Railway scene is only for holding trackage. This includes tracks, switches, turntables, and buffer stops.GameContent
The GameContent scene is for holding most functional objects. This includes stations, lost & founds, dumpsters, service centers, lights, post-processing, area blockers, and other objects the player will interact with gameplay-wise.Streaming
The Streaming scene is for holding visual-only objects that get streamed in around the player.
You can view and edit all scenes simultaneously by opening one and dragging the others into the hierarchy.
You can delete the default SampleScene scene.
MapInfo
You'll need to create a 'MapInfo' to define some properties about your map, such as its name.
To do this, right-click in the Project window, and go to Create > Mapify > MapInfo.
The name doesn't matter, but I'd recommend naming it MapInfo for simplicity.
Inside you'll see four properties, each of which should be self-explanatory. Set them as needed.
Tooltips
Most, if not all, fields on components have tooltips explaining their functionality. To view them, hover over the field momentarily, and it'll appear.
Terrain
Terrain Tools
The easiest way to create terrain is using the Terrain Tools Package. It allows you to easily create huge terrains, automatically split them into smaller chunks, load heightmaps, and it adds new tools for modifying terrain. Throughout this page, the assumption is made that you are using Terrain Tools.
For more information on creating terrains and using Terrain Tools, check out this great video from Brackeys.
Creating Terrain
After installing Terrain Tools (see 0:45 of the video above), you can create your terrain.
Open the Terrain scene, and set it as the active scene if you have multiple open. You can do this by right-clicking the scene in the hierarchy and clicking "Set Active Scene." If you can't click it, then it's already the active scene.
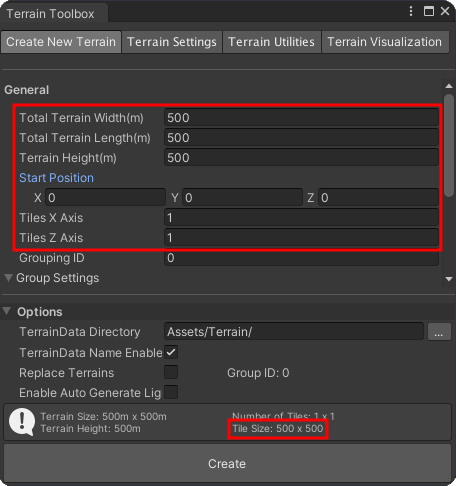
Now, open the Terrain Toolbox window by going to Window > Terrain > Terrain Toolbox.
The first three settings control the terrain's total width, length, and height. This will be the total size of your map. The width and length must be set to the same value! Note that you can always change these sizes later.
The fourth setting, Start Position, must have an X, Y, and Z of 0.
The fifth & sixth settings control how many tiles there are along each axis.
These must be set to the same value!
At the bottom of the window, there is a label called "Tile Size".
This shows you how large each tile is.
On the default Derail Valley map, each tile is 250x250.
Unless a different size is specifically required, you should set the tile count such that each tile is 250m x 250m.
Streaming Settings
You can customize how the terrain is streamed in around the player in the "Terrain Streaming" section of the MapInfo asset.
Terrain Loading Ring Size is the number of terrain assets to load around the player.
The value of this highly depends on the size of your terrain assets.
The smaller each terrain piece, the larger this should be.
The default should be fine if you're using the recommended size of 250m x 250m.
Non-Terrain Tools Setup
If you don't use Terrain Tools to create your terrain, you must follow some rules to ensure it gets loaded correctly.
- Terrain can only go in the terrain scene.
- All terrains must have unique TerrainData.
- All terrains must use the same material.
- All terrains must be the same size.
- All terrains must be square.
- All terrains must have the same Pixel Error*.
- All terrains must have the same Basemap Distance*.
- All terrains must have the same Draw Instanced state*.
* If each piece of terrain has a different setting, only the setting from the one closest to 0, 0 will be used.
Map Decorations
Map decorations are anything that aren't essential to the map functioning. This includes structures, props, etc.
All of these should go in the Streaming scene.
This will allow the game to dynamically stream them in around the player.
Streaming Configuration
You can customize how these assets get streamed in around the player in the "World Streaming" section of the MapInfo asset.
Chunk Size is the size, in meters, of each chunk.
To avoid issues when splitting up the scene, this should be set fairly high.
The value is restricted to be between 128 and 2048.
Vanilla sets it set to 1024, and I'd recommend no lower than 256.
World Loading Ring Size is the amount of chunks around the player that are loaded in.
Vanilla sets it to two, but this highly depends on the Chunk Size, and how open your map is.
Railway
Creating trackage may seem complicated at first, but you'll get used to it quickly.
All prefabs mentioned are located in the Mapify/Prefabs/Trackage folder.
Track Tools
Thanks to Wiz, we now have a set of tools to make creating trackage easier.
To access the tools, go to Mapify > Track Tools.
You can then dock that window wherever you see fit.
Basic Track
The easiest way to create a track is to use the Track prefab.
Grab it and drag it into the scene.
To avoid issues later, unpack the Track prefab.
You can unpack it by right-clicking on it in the scene hierarchy and clicking "Unpack Prefab Completely."
Only the Track prefab needs to be unpacked.
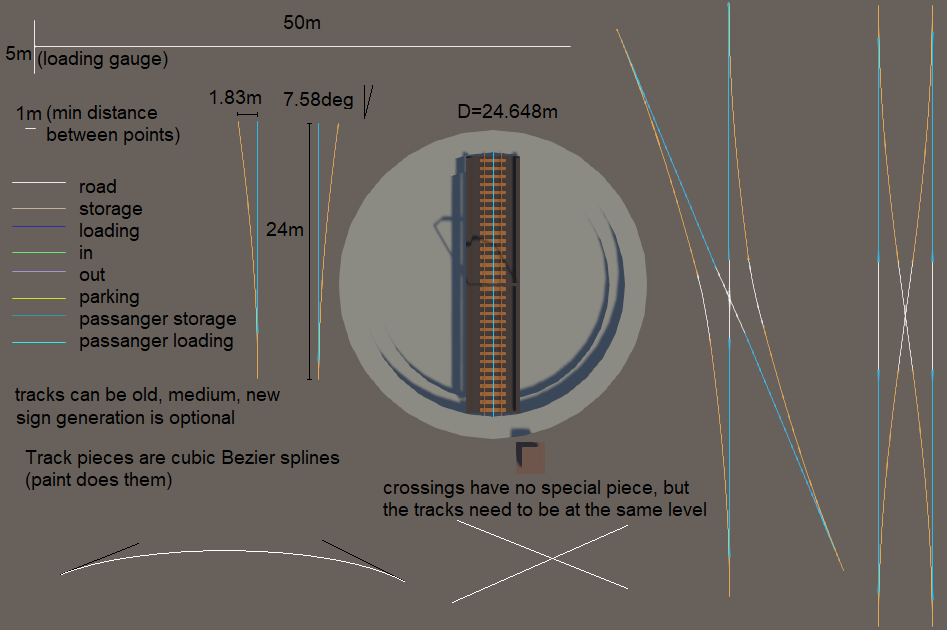
Each track is made up of a series of points with handles that control how the track will be created between them. There is currently no way to visualize the actual track in the editor.
On each piece of track, you'll see a Track component with a few fields.
Don't worry about those for now. We'll get to them in the Job Generation section.
To ensure your track isn't obscured by terrain or other objects, you can toggle Show Loading Gauge on the Track component.
This will show you the loading gauge overlayed on top of the track.
The loading gauge can be customized in the MapInfo object.
The defaults match that of the default Derail Valley map.
Switches
Switches can be placed using the Switch Left and Switch Right prefabs.
By default, the switch stand will be placed on the through side of the switch.
You can change this with the "Stand Side" option on the Switch component.
Switches must have a track attached to all ends.
You cannot modify the curves of switches! Derail Valley switches are a static asset; therefore, you can only use the switch angle they give us.
Turntables
The Default Turntable
The default turntable can be placed using the Turntable prefab.
To replace any one of the meshes on the default table, remove the Vanilla Object component from it and customize the Mesh Filter and Mesh Render as desired.
Custom Turntables
To create a custom turntable, start by creating a new object and adding the Turntable component to it.
Next, as a child, add the Turntable Control Panel prefab from the Components folder.
If you want to replace the mesh of the shed, remove the Vanilla Object component from it and customize the Mesh Filter and Mesh Render as desired.
To make the track, create a new object with a Track component and a Capsule Collider.
The Capsule Colliders' radius and center should be set to perfectly match the length of your track in the middle.
For the visuals of the table itself, create a new child of the track and set your meshes.
On the Turntable component, set the Bridge field to this child.
If you want to be able to push the turntable manually, add two objects under the Bridge object,
add Box Colliders to both, and assign them in the Turntable component.
Buffer Stops
The Default Buffer Stop
To use the default buffer stop, you can drag in the Buffer Stop prefab and snap it to the end of a track.
Custom Buffer Stops
To create custom buffer stops, create a new object with a Buffer Stop component.
When added, it'll also add a Track Snappable and a Box Collider.
To allow the buffer to snap to tracks, create a new child named "Snap Point".
This will be the reference point when snapping to trackage.
On the Track Snappable object, set the Reference Point to the "Snap Point" object.
The BoxCollider object is used to detect when a train hits it. It should be positioned a little in front of the buffer stop itself and about the width and height of the loading gauge.
To allow the buffer stop to interact with train buffers, create a new child called "Compression Point".
This should be positioned at coupler-height, and should be lined up with the front edge of the buffer.
On the Buffer Stop component, set the Compression Point to this object.
Lastly, create a new child called "Player Collider" with a Box Collider component.
This collider will be used to prevent the buffer stop from spawning inside a train when the game loads,
and as the collider the player interact with.
Back on the Buffer Stop, set the Player Collider to this object.
Locomotive Spawners
This page describes how to have locomotives spawn on tracks in your map.
There are two types of locomotive spawners:
- Vanilla Locomotive Spawner: can only spawn base game locomotives.
- Custom Locomotive Spawner: can also spawn Custom Car Loader(CCL) locomotives.
Both spawners function the same way, the only difference being how to set them up in the editor.
The Vanilla Locomotive Spawner uses enums to define what locomotives can spawn, making it easy to set up quickly.
The Custom Locomotive Spawner uses a list of locomotive IDs, making it compatible with CCL locomotives.
Nothing is preventing you from spawning vanilla locomotives with a custom spawner if you know their ID.
Station-based vs. Track-based
Locomotive Spawners can be set up in two ways. Either by adding the component to the same object your Track component is on, or the same (or child) object of a Station component.
The main difference is, with a station-based spawner, the game will try to spawn you at a station that has a locomotive you're licensed to use when loading in after cars fail to spawn, such as when trackage is modified between sessions.
Setup
Locomotive spawners may seem complicated at first, but they're actually quite simple. Each spawner consists of a list of 'Locomotive Groups', which are themselves a list of locomotives that should spawn.
When the game tries to spawn a locomotive, it'll pick a random locomotive group, then spawn all locomotives in that group in order. This allows you to spawn pairs of locomotives, such as the S282A (Locomotive) and S282B (Tender).
Job Generation
Station Setup
To get job generation working, you'll need to have at least two stations.
Stations can be created using the prefabs in Mapify/Prefabs/Station, or you can use your own.
Input/Output Cargo Groups
These two lists are where you'll define the production chains of your map. Each element contains a list of cargo types, and a list of stations.
These define what cargo types can go to, or come from, each station on the map.
Warehouse Machines
To load and unload cars, you'll need at least one warehouse machine with a loading track at each station. Warehouse Machines can support different cargo types, allowing you to have different areas for different cargo in the same station.
Assigning Tracks
On each Track component there are four fields related to job generation
- Station ID
- Yard ID
- Track ID
- Track Type
These fields should be pretty self-explanatory.
For job generation to occur, there must be at least one of each of the following types at all stations:
- Storage/PassengerStorage
- Loading/PassengerLoading
- In
- Out
Area Blockers
If you have an area on your map that should only be accessible if the player has a particular license, you can do that with an Area Blocker.
To create an Area Blocker, create a new GameObject in the GameContent scene.
Add at least one collider on this object, and size it to cover the area appropriately.
Then, add an Area Blocker component to the object.
On that component, you can choose what license the player needs to remove the barrier.
Service Stations
Services stations can be created using the Service Station prefab in the Mapify/Prefabs/Service Station folder.
They must be located in the GameContent scene.
Configuration
Service stations can be configured to support whatever resource types you want with the Resources list.
You may not have more than one of the same resource type.
Snapping To Track
To get the marker to snap to the track, you can add a new point to the track and set the Handle Type to None.
This will allow for a point that only defines position without affecting the curve.
Stores
Stores can be created using the Store prefab in the Mapify/Prefabs/Store folder, or you can assemble one manually.
Using The Vanilla Store
If you just want to place down a store to use, drag & drop the aforementioned prefab into the GameContent scene.
On the object you'll see an array called "Item Types". These are all the items that can be purchased at the store.
Creating Custom Stores
If you have your own store building you'd like to use, you can create your own store without reusing the vanilla assets.
To begin, add the Store component to your object, select the Item Module prefab
from Mapify/Prefabs/Store/Components as the Visual Prefab, and tick the "Is Custom" box.
Then, add a Cash Register prefab as a child of that object, and add it to the Store component.
Under the cash register, create two empty objects. These will be used as the reference point for the item modules, and the location where bought items will spawn. Add them to the Store component.
Now you can configure what items can be bough at the store, with a visual of where the item modules will be placed.
Lighting & Post Processing
Lighting
Lighting your scene is now controlled by Derail Valley's weather system.
For an approximate representation of how your scene will look in-game, you can add the Directional Light prefab in the Mapify/Prefabs/Misc folder to your GameContent scene.
Note: When Mapify builds your map, ^^all^^ Directional Lights will be ^^disabled^^.
Post Processing
Importing The Package
To add custom post-processing effects to your scene, you'll need to import the Post Processing package from the package manager.
You can open the package manager from Window > Package Manager, then select Unity Registry in the top left, and search for Post Processing.
Once you find it, simply click "Install" at the bottom right.
Setting Up The Global Volume
In the GameContent scene, create a new object called [GlobalPostProcessing].
On this object, add the Post-process Volume component, and tick the Is Global checkbox.
To a profile, click the "New" button to the far right of the Profile field.
In the Overrides section, you can now add the effects you want.
Note that Ambient Occlusion, Bloom, and Auto Exposure are set by the game and cannot be customized.
Exporting
Once it's time to export your map, you can do so by going to Mapify > Export Map.
Before you can export your map, you'll need to validate it. This is to ensure that everything is setup correctly and it'll load and be playable in-game.
To validate your map, simply click the "Validate" button at the top of the menu. If anything is wrong, you'll get a pop-up telling you what it is, with a button to jump to the problematic object.
If you want to validate your map while working on it, you can do so by going to Mapify > Validate Map.
For Testing
If you're exporting your map to test, click Export Map (Debug).
Exporting in debug mode exports directly into a folder, and doesn't compress the Asset Bundles. This means it'll build and load much faster, but can be an order of magnitude larger.
For Release
If you're exporting your map to release to others, click Export Map (Release).
This will create a .zip with the map inside so you don't have to worry about packaging it yourself.
It will also compress the Asset Bundles to reduce the overall file size of the map.
Updating
When it comes to updating Mapify, you can simply download the latest release from GitHub,
then go to Mapify > Package > Import and select the file you downloaded.
There may be breaking changes between Mapify versions. Because of this, make sure to check the Breaking Changes section before updating!
Breaking Changes
All breaking changes between Mapify versions will be listed here. Each change is relative to the last version in the list. If you're upgrading through multiple versions, read the list bottom-up, starting from the version after the one you're running.
0.4.0
- All
Locomotive Spawnercomponents must be replaced withVanilla Locomotive Spawners, and all values must be reassigned. - The
ManualShunterBookletandManualSteamBookletstore item types have been removed. Warehouse Machines must now be manually assigned to their respectiveStations.
0.3.0
- The Unity version has been bumped to 2019.4.40f1.
- All Store Item Types must be reassigned.
- All Track ages must be reassigned.
- All service station resources must be reassigned.
- Diesel service station resources are now required to be last in the list.
Contributing
Thank you for wanting to contribute to Mapify! Here you'll find all the technical details to get you started. Whenever you make changes, please ensure to update these docs!
Code
Documentation
Building The Project
Project Setup
Dependencies
To build Mapify, you'll need to have some dependencies installed.
If you're running windows, ensure you have Powershell 7 installed. If you're on Linux, you should be able to download it from your package manager.
Reference Directories
To ensure MSBuild and your IDE can find Derail Valley / Unity classes, and to avoid having to copy DLLs around,
you'll need to create a Directory.Build.targets file to specify your reference paths.
This file should be created in the root of the project, next to the LICENSE file.
You can use the examples below as templates depending on your operating system.
DvInstallDiris the directory where Derail Valley is installed (WhereDerailValley.exeis located).UnityInstallDiris the directory where Unity is installed (WhereUnity.exeorUnityis located).
Windows
Here's an example file for Windows you can use as a template.
Replace the provided paths with the paths to your Derail Valley installation directory.
Make sure to include the semicolons between each of the paths, but not after the last one!
Note that shortcuts like %ProgramFiles% cannot be used.
<Project>
    <PropertyGroup>
        <DvInstallDir>C:\Program Files (x86)\Steam\steamapps\common\Derail Valley</DvInstallDir>
        <UnityInstallDir>C:\Program Files\Unity\Hub\Editor\2019.4.40f1\Editor</UnityInstallDir>
        <ReferencePath>
            $(DvInstallDir)\DerailValley_Data\Managed\;
            $(DvInstallDir)\DerailValley_Data\Managed\UnityModManager\;
            $(UnityInstallDir)\Data\Managed\
        </ReferencePath>
        <AssemblySearchPaths>$(AssemblySearchPaths);$(ReferencePath);</AssemblySearchPaths>
    </PropertyGroup>
</Project>
Linux
Here's an example file for Linux you can use as a template. Replace the provided paths with the paths to your Derail Valley installation directory. Make sure to include the semicolons between each of the paths, but not after the last one!
<Project>
    <PropertyGroup>
        <DvInstallDir>/home/username/.local/share/Steam/steamapps/common/Derail Valley</DvInstallDir>
        <UnityInstallDir>/home/username/.local/share/UnityHub/Editor/2019.4.40f1/Editor</UnityInstallDir>
        <ReferencePath>
            $(DvInstallDir)/DerailValley_Data/Managed/;
            $(DvInstallDir)/DerailValley_Data/Managed/UnityModManager/;
            $(UnityInstallDir)/Data/Managed/
        </ReferencePath>
        <AssemblySearchPaths>$(AssemblySearchPaths);$(ReferencePath);</AssemblySearchPaths>
    </PropertyGroup>
</Project>
Packaging
To package a build for distribution, you can run the package.ps1 PowerShell script in the root of the project.
If no parameters are supplied, it will create a .zip file ready for distribution in the dist directory.
- Linux:
pwsh ./package.ps1 - Windows:
powershell -executionpolicy bypass .\package.ps1
Building Documentation
To build Mapify's docs, first install mdBook by following the installation instructions here.
Run mdbook serve --open in the docs folder to view the documentation in your webbrowser.
To build the docs, run mdbook build.
For information on how mdBook works, check out their documentation.